3-Layer Dulce de Leche Dream Cake – The Ultimate Caramel Delight
Description :
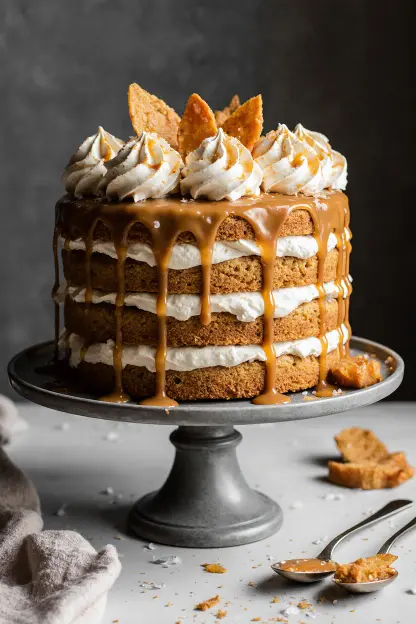
decadent Dulce de Leche Dream Cake, featuring layers of moist vanilla sponge cake generously filled and frosted with luscious homemade dulce de leche. This cake offers a perfect balance of sweetness and creamy caramel flavors, making it an unforgettable dessert for any celebration. For more irresistible dessert ideas and inspiration, don’t forget to follow us on Pinterest!
Why You’ll Love This Recipe :
This cake transcends mere dessert—it’s a euphoric celebration for the senses. The ethereal, cloud‑light sponge melds with velvety, homemade dulce de leche in a decadent pas de deux of textures and flavors that will ignite your deepest cravings. Surprisingly effortless to assemble, this sublime creation is instantly elevated to gourmet status by the luscious caramel “gold” you craft yourself. Ideal for milestone birthdays, romantic anniversaries, or any moment you yearn to astonish your guests, its dramatic caramel cascade and artful toppings transform it into an unforgettable centerpiece. Indulge in this luxurious masterpiece and watch every bite become a moment of pure bliss.
Introduction :
Dulce de leche a rich, creamy caramel-like confection has the power to elevate any dessert into something extraordinary. This Dulce de Leche Dream Cake is a perfect example: soft layers of vanilla sponge cake are generously slathered with homemade dulce de leche, creating a dessert that’s both comforting and elegant.
We begin with a light, airy vanilla sponge, an ideal base for showcasing the star of the show. While store-bought dulce de leche works in a pinch, the homemade version is surprisingly simple and offers a deeper, creamier flavor. All you need is a can of sweetened condensed milk and a little patience.
Once the dulce de leche is ready, it’s time to assemble: spread a thick layer between each cake tier, frost the outside, and finish with a golden caramel drip cascading down the sides. For a final flourish, top with whipped cream swirls, caramel shards for crunch, or a pinch of sea salt to balance the sweetness.
This isn’t just a recipe—it’s a celebration of indulgence, simplicity, and flavor. So grab your ingredients, turn up the music, and let’s bake a cake that tastes like pure caramel bliss.
Ingredients :
For the Vanilla Sponge Cake :
- 2 cups all-purpose flour
- 2 teaspoons baking powder
- 1/2 teaspoon salt
- 1 cup (2 sticks) unsalted butter, softened
- 1 3/4 cups granulated sugar
- 2 large eggs
- 1 teaspoon vanilla extract
- 1 cup milk
For the Homemade Dulce de Leche :
- 2 (14-ounce) cans sweetened condensed milk
For the Caramel Drip :
- 1/2 cup granulated sugar
- 2 tablespoons water
- 2 tablespoons heavy cream
- 1 tablespoon unsalted butter
For the Toppings :
- Whipped cream
- Caramel shards
- Sea salt
Preparation :
Step 1 : Make the Dulce de Leche: Remove the labels from the cans of sweetened condensed milk. Place the cans in a large pot and cover them completely with water. Bring the water to a boil, then reduce the heat to a simmer. Cover the pot and let it simmer for 3-4 hours, ensuring the cans remain submerged in water at all times. Check the water level periodically and add more if needed. After 3-4 hours, carefully remove the cans from the pot and let them cool completely before opening. This step can be done a day or two in advance.
Step 2 : Prepare the Cake Pans: Preheat your oven to 350°F (175°C) grease and flour two 9-inch round cake pans. You can also line the bottoms of the pans with parchment paper circles for easy removal.
Step 3 : Mix Dry Ingredients: In a medium bowl, whisk together the flour, baking powder, and salt.
Step 4 : Cream Butter and Sugar: In a large bowl, cream together the softened butter and granulated sugar until light and fluffy. This usually takes about 3-5 minutes with an electric mixer.
Step 5 : Add Eggs and Vanilla: Beat in the eggs one at a time, then stir in the vanilla extract.
Step 6 : Alternate Adding Dry and Wet Ingredients: Gradually add the dry ingredients to the wet ingredients, alternating with the milk. Begin and end with the dry ingredients. Mix until just combined, being careful not to overmix.
Step 7 : Bake the Cakes: Divide the batter evenly between the prepared cake pans. Bake for 25-30 minutes, or until a wooden skewer inserted into the center comes out clean.
Step 8 : Cool the Cakes: Let the cakes cool in the pans for 10 minutes, then invert them onto a wire rack to cool completely.
Step 9 : Make Caramel Drip (Optional): In a small saucepan, combine the sugar and water. Cook over medium heat, without stirring, until the sugar dissolves and the mixture turns a deep amber color. Remove from heat and carefully whisk in the heavy cream and butter. Be careful, as the mixture will bubble vigorously. Let the caramel cool slightly before using.
Step 10 : Assemble the Cake: Once the cakes are completely cool, level the tops with a serrated knife if necessary. Place one cake layer on a serving plate or cake stand. Spread a generous amount of dulce de leche over the top. Place the second cake layer on top of the dulce de leche. Frost the entire cake with the remaining dulce de leche.
Step 11 : Add Caramel Drip (Optional): If using, pour the cooled caramel over the top of the cake, allowing it to drip down the sides.
Step 12 : Add Toppings (Optional): Decorate the cake with swirls of whipped cream, caramel shards, or a light dusting of sea salt.
COOK Rating : 5/5
Serving Suggestions :
Serve this cake chilled or at room temperature. It pairs perfectly with a cup of coffee, tea, or a glass of milk. You can also serve it with a scoop of vanilla ice cream for an extra decadent treat.
Tips :
- To prevent the cakes from sticking, make sure to grease and flour the cake pans thoroughly. You can also use baking spray with flour.
- Don’t overmix the cake batter, as this can result in a tough cake.
- To make the dulce de leche even easier, you can use a slow cooker. Place the cans of sweetened condensed milk in the slow cooker, cover them with water, and cook on low for 8-10 hours.
- If you don’t have time to make your own dulce de leche, you can use store-bought dulce de leche. Just make sure to choose a high-quality brand.
- For a more intense caramel flavor, you can add a tablespoon of caramel extract to the cake batter.
- To prevent the caramel drip from being too thin, make sure to let it cool slightly before pouring it over the cake.
- This cake can be stored in the refrigerator for up to 3 days.
Prep Time : 30 minutes Cook Time: 3 hours 30 minutes (including dulce de leche) Total Time: 4 hours
Nutrition Information :
(Approximate, per slice, based on 12 servings) Calories: 650 Protein: 8g Sodium: 250mg
Conclusion :
The Dulce de Leche Dream Cake is a testament to the transformative power of baking. From the simple ingredients to the final, stunning presentation, every step of the process is infused with love and care. The combination of the light sponge cake, the rich dulce de leche, and the optional toppings creates a dessert that is both satisfying and sophisticated. Whether you’re celebrating a special occasion or simply craving a sweet treat, this cake is sure to impress. So, go ahead, indulge in a slice of caramel heaven and experience the magic for yourself. The compliments will come rolling in!