Buckeye Bars
Description
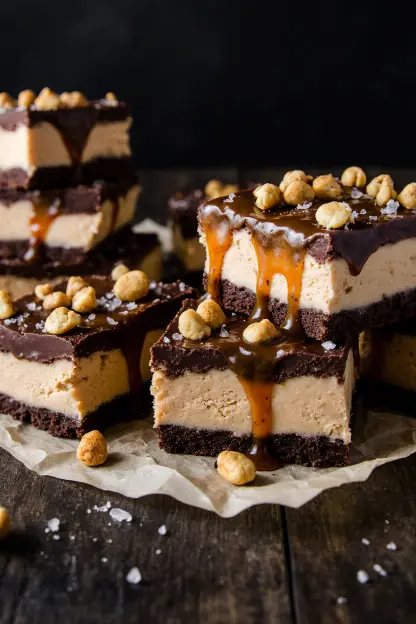
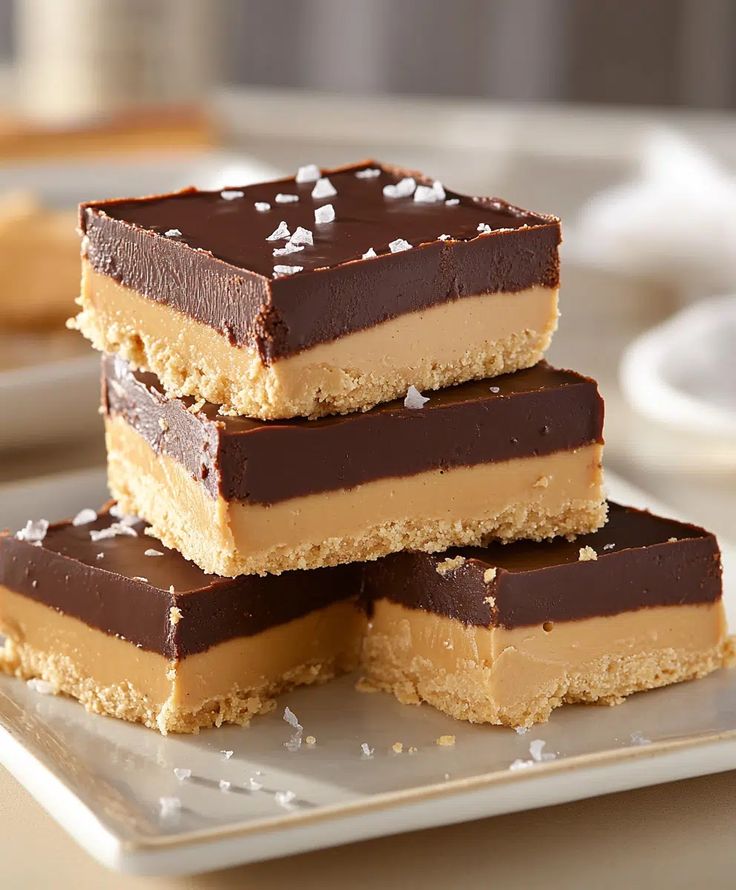
Buckeye Bars are a delightful twist on the classic peanut butter and chocolate treat. Perfect for parties, potlucks, or satisfying your sweet tooth, these bars feature a creamy peanut butter layer topped with a rich chocolate ganache, all set in a convenient bar form. They are easy to make and even easier to devour!
Why You’ll Love This Recipe
These Buckeye Bars are a crowd-pleaser for several reasons:
Easy to Make: With simple ingredients and straightforward instructions, these bars are easy to whip up, even for novice bakers. Delicious Flavor Combination: The classic pairing of peanut butter and chocolate is always a winner, and these bars deliver that perfect balance of sweet and salty. Perfect for Sharing: Cut into bars, they are ideal for serving at parties, potlucks, or as a sweet treat to share with friends and family. Make-Ahead Friendly: These bars can be made in advance and stored in the refrigerator, making them a convenient option for busy schedules. No-Bake: No need to turn on your oven! These bars are a no-bake treat, perfect for warmer months or when you want a quick and easy dessert. Customizable: Feel free to experiment with different types of chocolate (milk, dark, or white) or add a sprinkle of sea salt on top for an extra flavor boost.
Introduction
Buckeye Bars are a no-bake dessert that brings together the irresistible combination of peanut butter and chocolate in a convenient, easy-to-serve form. Inspired by the classic Buckeye candy, which resembles the nut of the Ohio Buckeye tree, these bars offer the same delicious flavors but in a more substantial and shareable format. The creamy peanut butter filling, perfectly sweet and slightly salty, is complemented by a rich, smooth chocolate ganache that elevates this treat to a whole new level of indulgence.
What sets these Buckeye Bars apart is their simplicity and adaptability. Whether you’re a seasoned baker or just starting out, you’ll find the recipe straightforward and easy to follow. With minimal ingredients and no oven required, they’re a perfect choice for warm weather or when you need a quick dessert without a lot of fuss. Plus, they’re incredibly versatile – you can customize the flavors and textures to suit your preferences, making them a delightful addition to any occasion.
Imagine serving these bars at your next gathering. The rich, decadent aroma fills the air as you unveil the tray, revealing neat rows of peanut butter and chocolate perfection. Guests eagerly reach for a slice, and the first bite elicits a chorus of “mmm’s” and satisfied smiles. These Buckeye Bars are not just a dessert; they’re an experience, a moment of pure, unadulterated joy that brings people together.
From potlucks and parties to holiday gatherings and everyday sweet cravings, Buckeye Bars are the perfect treat for any occasion. They are simple enough to whip up on a whim, yet impressive enough to wow your guests. And because they can be made ahead of time, they offer a stress-free dessert solution that allows you to focus on enjoying the moment. So, gather your ingredients, put on your favorite music, and get ready to embark on a delightful culinary adventure that will leave you with a batch of Buckeye Bars that are sure to disappear in no time.
Ingredients:
Peanut Butter Bars:
8 tablespoons (1 stick) salted sweet cream butter, softened 3 cups creamy peanut butter 2 teaspoons pure vanilla extract 4 cups powdered sugar Chocolate Ganache:
12 ounces semi-sweet chocolate chips 2 tablespoons vegetable oil
Preparation:
Step 1: Prepare the Baking Dish: Line a 9×13-inch baking dish with parchment paper, ensuring the paper extends over the sides to easily lift the bars out later. This prevents sticking and makes cleanup a breeze. Set the prepared dish aside. The parchment paper acts as a sling, allowing you to effortlessly remove the bars from the pan once they are set, without any sticking or crumbling. This is especially useful for a dessert as rich and dense as Buckeye Bars.
Step 2: Cream the Butter: In a stand mixer fitted with the paddle attachment (or using a medium-sized mixing bowl and a handheld mixer), beat the softened butter on medium-high speed for 1 minute until smooth and creamy. This ensures the butter is well incorporated, resulting in a smoother peanut butter layer. Softened butter is crucial for achieving a creamy texture. If the butter is too cold, it will be difficult to incorporate, resulting in a lumpy mixture. If it’s too melted, the bars may become greasy. The ideal consistency is when the butter is soft enough to easily spread but still holds its shape.
Step 3: Add Peanut Butter and Vanilla: Add the creamy peanut butter and pure vanilla extract to the butter. Continue mixing on medium speed for another minute until the mixture is smooth and well combined. This step infuses the peanut butter flavor and enhances the overall taste. Using a high-quality creamy peanut butter is essential for achieving the right texture and flavor. Avoid using natural peanut butter that separates, as it can make the mixture too oily. Pure vanilla extract adds a subtle, warm note that complements the peanut butter perfectly, enhancing the overall flavor profile of the bars.
Step 4: Incorporate Powdered Sugar: Reduce the mixer speed to medium-low and gradually add the powdered sugar, 1 cup at a time. Mix well after each addition to ensure the sugar is fully incorporated and to prevent a powdery mess. Increase the mixer speed to medium-high and continue mixing until the mixture is completely combined and smooth. The mixture will be thick. Adding the powdered sugar gradually is key to preventing a cloud of sugar from puffing up and making a mess. It also ensures that the sugar is evenly distributed throughout the peanut butter mixture, resulting in a smooth, consistent texture. The mixture will become quite thick, which is normal.
Step 5: Press into Baking Dish: Using a silicone spatula or an offset spatula, evenly spread the peanut butter mixture into the bottom of the prepared baking dish. For a smooth and even surface, you can use a piece of wax paper or plastic wrap to gently press down on the mixture. Evenly spreading the peanut butter mixture ensures that each bar has a consistent thickness and texture. Using wax paper or plastic wrap prevents the mixture from sticking to your hands or spatula, making it easier to achieve a smooth, professional-looking finish.
Step 6: Prepare the Chocolate Ganache: In a small microwave-safe bowl, combine the semi-sweet chocolate chips and vegetable oil. Heat in the microwave for 1 minute. Remove and stir. If the chocolate is not completely melted, continue to heat in 15-second intervals, stirring after each interval, until the mixture is completely smooth and glossy. The vegetable oil helps to create a smooth, glossy ganache that is easy to spread. Heating the chocolate in short intervals and stirring in between prevents it from burning or seizing up. Patience is key to achieving the perfect ganache consistency.
Step 7: Spread Ganache: Using a silicone spatula or an offset spatula, evenly spread the melted chocolate ganache over the peanut butter layer. Ensure the entire peanut butter layer is covered to create a beautiful and delicious chocolate topping. Spreading the ganache evenly ensures that each bar has a consistent chocolate layer. The contrast between the peanut butter and chocolate layers creates a visually appealing and delicious treat.
Step 8: Initial Chill: Cover the baking dish with plastic wrap or foil and chill in the refrigerator for 15 to 20 minutes. This short chill helps the chocolate ganache set slightly, making it easier to slice the bars neatly. This initial chill helps to firm up the chocolate ganache, preventing it from smearing when you slice the bars. It also helps to set the two layers together, making them easier to handle.
Step 9: Slice the Bars: Remove the baking dish from the refrigerator. Carefully slice the buckeye bars into 15 (2½-inch x 3-inch) pieces. Slicing at this stage, when the chocolate is partially set, helps prevent cracking. Using a sharp knife and slicing the bars while the chocolate is still slightly soft helps to prevent it from cracking and creating a clean, professional-looking cut.
Step 10: Final Chill: Cover the baking dish again and return the bars to the refrigerator to continue chilling for an additional 1 hour and 45 minutes (or longer). This final chill allows the bars to firm up completely, making them easier to handle and serve. The final chill is essential for allowing the bars to fully set, making them easier to handle and preventing them from becoming too soft or messy.
Step 11: Serve: Remove the bars from the dish by lifting the parchment paper overhang. You may need to carefully re-slice the bars along the previous cuts to separate them cleanly. Lifting the bars out using the parchment paper overhang makes it easy to remove them from the pan without damaging them. Re-slicing along the previous cuts ensures that the bars are cleanly separated and ready to serve.
COOK Rating: 5/5
Serving Suggestions:
Serve chilled for the best texture and flavor. Cut into smaller squares for bite-sized treats. Garnish with a sprinkle of sea salt for a salty-sweet contrast. Pair with a glass of cold milk or a scoop of vanilla ice cream. Include them in a dessert platter with other sweet treats. Wrap individually for party favors or gifts.
Tips:
Use softened butter for a smooth and creamy peanut butter layer. Microwave the chocolate in short intervals to prevent burning. Slice the bars after the initial chill to prevent the chocolate from cracking. Use parchment paper to line the baking dish for easy removal. Store the bars in the refrigerator to maintain their shape and texture. For an extra touch, drizzle melted chocolate over the bars before the final chill. If the peanut butter mixture is too dry, add a tablespoon of milk or cream to moisten it. If the chocolate ganache is too thick, add a teaspoon of vegetable oil to thin it. For a richer flavor, use dark chocolate chips for the ganache. Add chopped nuts (such as peanuts or pecans) to the peanut butter layer for extra crunch.
Prep Time: 20 minutes Cook Time: 5 minutes Total Time: 2 hours (includes chilling time)
Nutrition Information:
(per serving, approximate) Note: Nutritional information is an estimate and can vary based on specific ingredients and portion sizes.
Calories: 350 Protein: 8g Sodium: 150mg
Conclusion
Buckeye Bars are a delightful and easy-to-make treat that combines the classic flavors of peanut butter and chocolate in a convenient bar form. Whether you’re looking for a crowd-pleasing dessert for a party or a sweet treat to satisfy your cravings, these bars are sure to be a hit. With simple ingredients and straightforward instructions, you can whip up a batch of these delicious bars in no time. So go ahead, indulge in the irresistible combination of peanut butter and chocolate with these Buckeye Bars!
Question 1: Can I use natural peanut butter for this recipe?
Answer: While you can use natural peanut butter, be aware that it may result in a slightly different texture. Natural peanut butter tends to be runnier than processed peanut butter, so the peanut butter layer may be softer and less firm. If using natural peanut butter, you may need to add a bit more powdered sugar to achieve the desired consistency. Also, make sure to thoroughly stir the natural peanut butter before measuring to ensure a consistent texture.
Question 2: Can I use different types of chocolate for the ganache?
Answer: Yes, you can definitely experiment with different types of chocolate for the ganache. Milk chocolate will create a sweeter ganache, while dark chocolate will provide a richer, more intense flavor. White chocolate is another option for a unique twist. Adjust the amount of vegetable oil as needed to achieve a smooth, pourable consistency. Keep in mind that different chocolates have varying amounts of cocoa butter, which will affect the final texture of the ganache.
Question 3: How long can I store these Buckeye Bars?
Answer: These Buckeye Bars can be stored in an airtight container in the refrigerator for up to a week. The cool temperature will help maintain their shape and texture. If you plan to store them for longer, you can freeze them for up to a month. Wrap them tightly in plastic wrap and then in foil before freezing. Thaw in the refrigerator before serving. When freezing, consider cutting the bars into individual portions before wrapping to make thawing easier.
Question 4: Can I make these bars without a mixer?
Answer: Yes, you can make these bars without a mixer, although it may require a bit more elbow grease. Use a sturdy spoon or spatula to cream the butter and incorporate the peanut butter and vanilla. Be sure to mix the powdered sugar in gradually and thoroughly to avoid lumps. The mixture may be a bit denser, but the bars will still be delicious. To make the process easier, ensure the butter is very soft and consider sifting the powdered sugar to remove any lumps before adding it to the mixture.
Question 5: Can I add anything else to these bars for extra flavor or texture?
Answer: Absolutely! There are many ways to customize these Buckeye Bars. You can add chopped nuts (such as peanuts, pecans, or walnuts) to the peanut butter layer for extra crunch. You can also sprinkle sea salt on top of the chocolate ganache for a salty-sweet contrast. For a more decadent treat, drizzle melted white chocolate over the bars before the final chill. Get creative and experiment with your favorite flavors and textures! Other options include adding a layer of mini chocolate chips to the peanut butter mixture, swirling peanut butter into the chocolate ganache for a marbled effect, or adding a dash of cinnamon or espresso powder to the peanut butter for a unique flavor twist.